Built-in Support for Telegram Customers
While subscriptions are great, they're not enough on their own. Make sure to interact with your Telegram subscribers and provide them with value beyond just access to your service.
We strongly believe that communication is key for any successful business, including Telegram subscription businesses. That's why we provide you with the necessary tools to effectively engage and interact with your customers.
At BotSubscription, our top priorities are always our partners - you. We're committed to supporting you every step of the way. We believe that the key to success is putting your customers first. Take the time to understand their needs and concerns, and work tirelessly to find solutions to their problems. Show your dedication to your subscribers, and they will love you for it. By prioritizing customer satisfaction, you can't go wrong.
How built-in support works
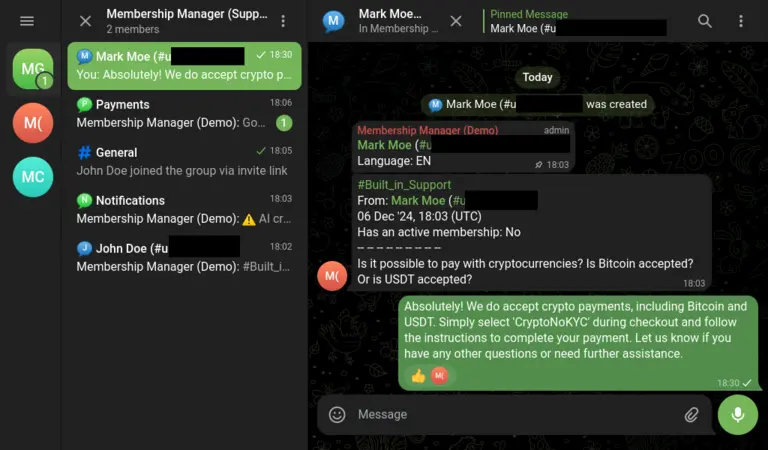
When customers have questions about their Telegram subscriptions, they may reach out to your bot directly. It's important not to miss these messages. That's why BotSubscription offers exceptional customer service that goes above and beyond. Any message that your bot receives that is not recognized as a command or related to one will be forwarded to you. You can respond to these messages and initiate a conversation with your customers. BotSubscription will provide information about the sender, such as their first and last name and Telegram ID, and send the message to all administrators or the support group if you have one. Any administrator can reply anonymously on behalf of the bot using the reply option in Telegram.
"Built-in support" is turned on by default but can be disabled if you choose not to use it.
If you no longer wish to use the built-in support feature, you can disable it by following these simple steps:
- Open the
/settingsmenu of your bot - Select "Notifications"
- Find "Built-in support" and switch it off
That's it! Once you do that, you won't receive any more support requests via the built-in system.
Support group
Managing a Telegram business with a team can be made easier by setting up a support group. With this feature enabled, bots will automatically forward all relevant information, including messages from customers, to the group. Each member of the group can then view and respond to these messages using the reply function in Telegram. In addition, messages that are not related to the bot will not be forwarded, allowing for free and open communication among administrators within the same group.
To set up a support group, please follow these steps:
- Create a chat group in Telegram and add your bot to it.
- Open your bot's
/settingsmenu - Select "Group Management"
- Choose "Support Group"
- Select the chat you want to use as your support group
What types of messages are supported?
All types of messages are supported, including text, animations (GIF), audio and video recordings, documents, photos, stickers, etc. Our system is designed to capture and forward all customer messages to ensure that you do not miss any communication with your subscribers, regardless of the format they use to express themselves. While the formatting of some messages may differ slightly when forwarded by the bot, you will always be able to see the content of the messages and respond to them accordingly.
Telegram Topics
Since November 2022, Telegram has introduced Group Topics, which allows users to organize groups and create separate spaces for different subjects. At BotSubscription, we have adopted this feature for our built-in support. Rather than forwarding all messages and notifications from your users to a single chat, we create a new topic for each user chat. This keeps your support group organized and tidy, even if you receive hundreds of messages daily. So you can easily follow up on previous conversations without any confusion.
To enable topics for your support group, please follow these steps:
- Create and set up a support group, if you haven't done so yet.
- Open your group's settings and enable "Topics."

Open your group's settings and enable "Topics." - Make sure your bot has permissions to manage topics in the support group.
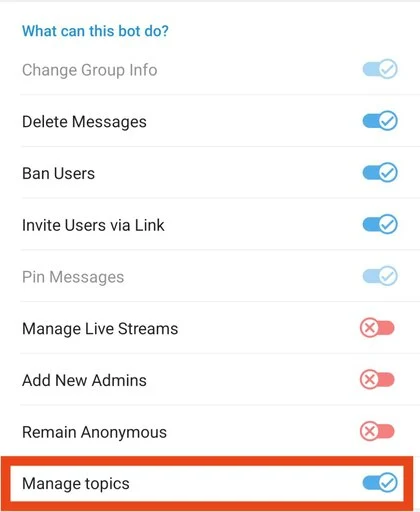
Make sure your bot has the necessary permission to "Manage Topics" in your support group. - Open your bot's
/settingsmenu, then navigate to "Group Management" -> "Support Group" - Enable the "Topics" option to utilize this feature in your support group.
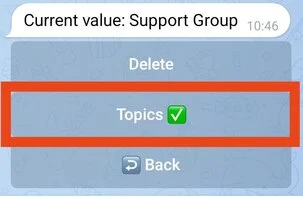
Enable the "Topics" option to utilize this feature in your support group.
Great job! You have successfully enabled the Topics feature for your support group.
The first thing that will happen is your bot will create a few topics: Notifications and Payments. Notifications will be where the bot sends all notifications, such as new bot launches, while Payments will be where the bot sends payment notifications for new members, renewals, and so on.
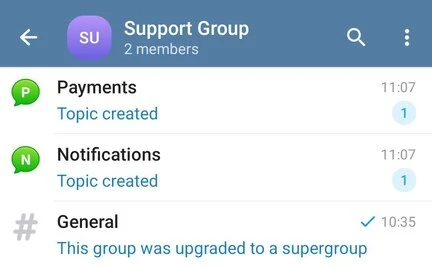
Now, every time a user messages your bot, a new topic will be automatically created for that conversation. This way, each user is separated from one another, as well as from notifications and payments, ensuring that everything stays organized and easy to manage.
Filters
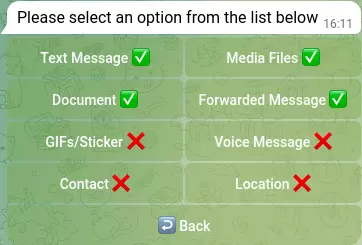
Filters are a powerful tool that puts you in control of the messages you receive through the built-in support feature. With filters, you can customize your message preferences and choose what types of messages you want to receive. Whether it's text messages, media files, documents, contacts, locations, or more, you have the flexibility to select the message types that matter most to you.
To access the filters, simply navigate to the /settings menu in your bot and select 'Notifications'. From there, choose 'Built-in Support' and you'll find the 'Filters' option. Here, you can fine-tune your message preferences to suit your needs.
You can selectively choose specific message types that are relevant to you, allowing you to focus on what matters most. Additionally, if there are certain message types that you prefer not to receive, you can block them to avoid any unwanted distractions.
Message Delivery Confirmation
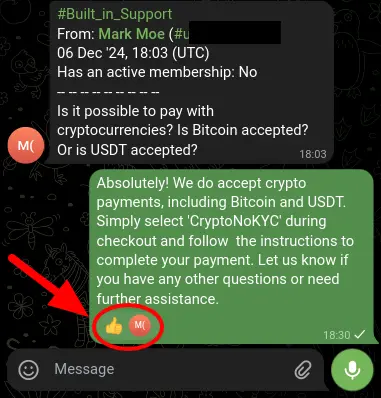
When utilizing the built-in support to send messages to your customers, the bot ensures you receive a confirmation. A responsive 👍 emoji signifies the successful delivery of your message. Seeing this indicates that the user has received your message.
Exclusive Support for Paying Customers
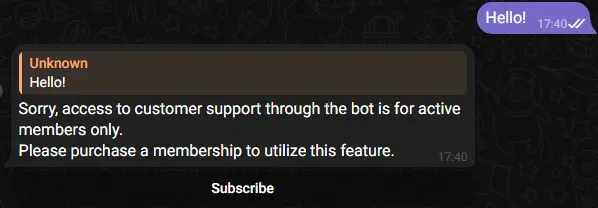
Admins can choose to offer support exclusively to paying customers. Unlike the default setting where it's available to everyone, this optional feature ensures a prioritized and premium assistance experience for those who have subscribed to your services.
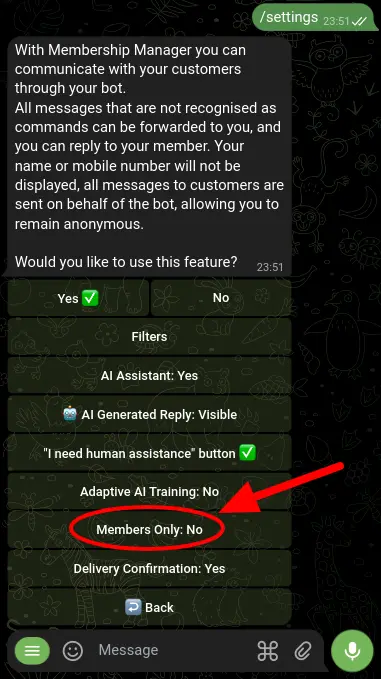
To enable this feature, navigate to /settings, then Notifications, and finally Built-in Support. Here, you can toggle the 'Members Only' option:
- Set it to 'Yes' to make support available exclusively for paying customers.
- Set it to 'No' to keep support accessible to everyone.
Last updated: